Building a Rotisserie
Building a rotisseie
took a 3 day weekend memorial day weekend 2002. About 20 hours over 3 days. This
includes learning to weld, as well as mounting the car and fine tuning.
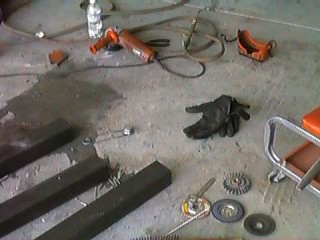 The required tools
are simple, an angle grinder with the various grinding wheels, a good heavy set
of leather gloves, vice grips, wire brush, and a torch with eye protection. I
had never used a gas welding rig before so there was some learning curve. First
I read a book on welding. Then practiced on scrap metal before I started. I quickly
learned that the natural tendency is to not heat the metal enough. This makes
poor quality weak welds. Don't be afraid to heat the metal up cherry red before
starting the braze. On thick steel pipe it isn't easy to melt through, the braze
should flow on and be a bubbly liquid without beading. WHen the metal is beading
its not hot enough.
The required tools
are simple, an angle grinder with the various grinding wheels, a good heavy set
of leather gloves, vice grips, wire brush, and a torch with eye protection. I
had never used a gas welding rig before so there was some learning curve. First
I read a book on welding. Then practiced on scrap metal before I started. I quickly
learned that the natural tendency is to not heat the metal enough. This makes
poor quality weak welds. Don't be afraid to heat the metal up cherry red before
starting the braze. On thick steel pipe it isn't easy to melt through, the braze
should flow on and be a bubbly liquid without beading. WHen the metal is beading
its not hot enough.
 I designed the
rotisserie based on a few I had seen on other sites, a tape measure, and a napkin.
Its built from 3 inch square pipe bought from a local steel yard. The steel cost
about $150 plus $50 in wheels. The steel yard made all the cuts for me. They charged
$1 per cut. but lost track after the first 5-6 cuts so I ended up getting all
the cuts done for about $10, worth every penny. For all the other cuts I used
a skill saw with a metal blade, its slow but works. I'm sure I would have gone
through at least 3 10 dollar metal blades everything.
I designed the
rotisserie based on a few I had seen on other sites, a tape measure, and a napkin.
Its built from 3 inch square pipe bought from a local steel yard. The steel cost
about $150 plus $50 in wheels. The steel yard made all the cuts for me. They charged
$1 per cut. but lost track after the first 5-6 cuts so I ended up getting all
the cuts done for about $10, worth every penny. For all the other cuts I used
a skill saw with a metal blade, its slow but works. I'm sure I would have gone
through at least 3 10 dollar metal blades everything.
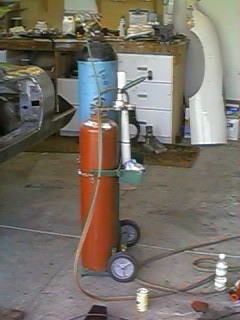 Here is the welding
rig. I didn't own any welding equipment when I started this project and a friend
loaned this to me. He hadn't used it in years and let me keep it as long as I
needed. Worked perfectly for me once I learned how to braze. I made about 6 welds
which I later had redo before I got the hang of it.
Here is the welding
rig. I didn't own any welding equipment when I started this project and a friend
loaned this to me. He hadn't used it in years and let me keep it as long as I
needed. Worked perfectly for me once I learned how to braze. I made about 6 welds
which I later had redo before I got the hang of it.
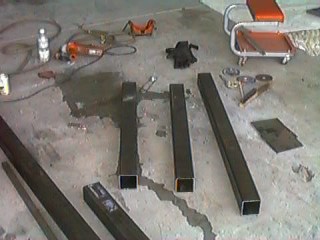
 First I built
steel boxes which sleeved over the main uprights on which the car mounts. You
can see them on the left, then the frames. If I had it to do over I wouldn't make
the square plate on the end of the pipe as big. The rear one should be about the
size of a license plate, and the front one didn't need to be more than 6-8 inches
square. Mine were both 12 inches square. The larger plates get in the way when
trying to do work on the front and rear of the car. Its not a huge problem, but
could be better.
First I built
steel boxes which sleeved over the main uprights on which the car mounts. You
can see them on the left, then the frames. If I had it to do over I wouldn't make
the square plate on the end of the pipe as big. The rear one should be about the
size of a license plate, and the front one didn't need to be more than 6-8 inches
square. Mine were both 12 inches square. The larger plates get in the way when
trying to do work on the front and rear of the car. Its not a huge problem, but
could be better.
 Here I've got one
of the frames built up. Its four feet wide, by four feet tall, and four feet long.
Each end will have three casters. One with a lock on each end.
Here I've got one
of the frames built up. Its four feet wide, by four feet tall, and four feet long.
Each end will have three casters. One with a lock on each end.
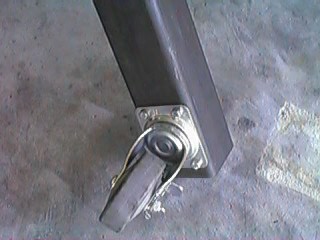 I used standard
1/2" bolts to attach the casters. I drilled and tapped the thread right into
the steel. Its simple enough, but a lot of hard work. Burned out at least 2 drill
bits on this process.
I used standard
1/2" bolts to attach the casters. I drilled and tapped the thread right into
the steel. Its simple enough, but a lot of hard work. Burned out at least 2 drill
bits on this process.
 Here is a shot
of the holes getting tapped for a wheel. Notice the engine on the stand in the
back ground. I put it in a garbage bag to stop oil from dripping all over the
place.
Here is a shot
of the holes getting tapped for a wheel. Notice the engine on the stand in the
back ground. I put it in a garbage bag to stop oil from dripping all over the
place.
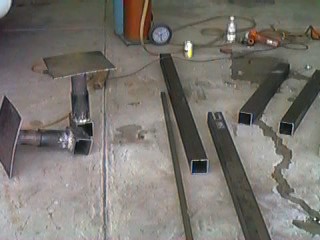
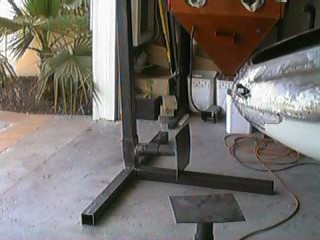 Here is the basic
unit before wheels, many more holes to drill and tap. Tap bolts into the vertical
shaft at several levels to hold the car up. I started with one 1/2" bolt
on the rear, but upgraded these to 9/16" later. On the pipe, I welded a 3/4"
Nut and drilled through the outer sleeve. The friction of the bolt pressing on
the inner pipe lets the car be turned to any position and hold the angle. I welded
a big washer on the top of the bolt so I didn't need a wrench to adjust the pressure.
Here is the basic
unit before wheels, many more holes to drill and tap. Tap bolts into the vertical
shaft at several levels to hold the car up. I started with one 1/2" bolt
on the rear, but upgraded these to 9/16" later. On the pipe, I welded a 3/4"
Nut and drilled through the outer sleeve. The friction of the bolt pressing on
the inner pipe lets the car be turned to any position and hold the angle. I welded
a big washer on the top of the bolt so I didn't need a wrench to adjust the pressure.
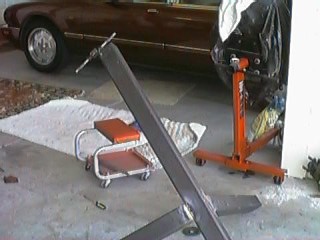
 Now with wheels
on and ready to mount. on the car. Still need to build the other end. I use the
engine crane to adjust the level of the car, just attach the crane to the rotation
pipe and crank it up or down. Once the correct level is achieved, drill and tap
a new hole in the vertical to hold the position. I've sometimes use a come along
strapped over the top of the post and anchored on the bottom bar to do this as
well. The come along doesn't work as well, but is allot easier to get setup. Height
changes are rare so its not a big issue.
Now with wheels
on and ready to mount. on the car. Still need to build the other end. I use the
engine crane to adjust the level of the car, just attach the crane to the rotation
pipe and crank it up or down. Once the correct level is achieved, drill and tap
a new hole in the vertical to hold the position. I've sometimes use a come along
strapped over the top of the post and anchored on the bottom bar to do this as
well. The come along doesn't work as well, but is allot easier to get setup. Height
changes are rare so its not a big issue.
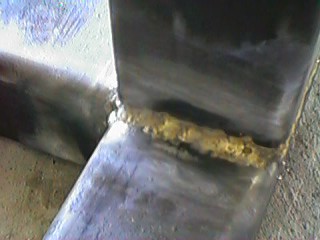 Here is an example
of what a joint should look like. Actually its not perfect, but at least solid.
If you do brazing and see beads of brass or bubbles, The weld is to cool and will
break, or peel off. Its not easy to melt steel at this thickness so don't worry
about burn through.
Here is an example
of what a joint should look like. Actually its not perfect, but at least solid.
If you do brazing and see beads of brass or bubbles, The weld is to cool and will
break, or peel off. Its not easy to melt steel at this thickness so don't worry
about burn through.
 Neglected to take
many pictures to show building the front of the Rotisserie, but it was the same
with exception of the body mounting bracket. I used one inch square stock. and
make little L brackets which bolted on where to the top outer sub frame mounts.
I should have used two inch square or thicker side wall one inch stock. The one
inch stock bent under the weight of the car causing me to have to add an angle
iron brace to stiffen it up. I had some poor quality brazes also which caused
a scare, when transporting the car to the blaster.
Neglected to take
many pictures to show building the front of the Rotisserie, but it was the same
with exception of the body mounting bracket. I used one inch square stock. and
make little L brackets which bolted on where to the top outer sub frame mounts.
I should have used two inch square or thicker side wall one inch stock. The one
inch stock bent under the weight of the car causing me to have to add an angle
iron brace to stiffen it up. I had some poor quality brazes also which caused
a scare, when transporting the car to the blaster.
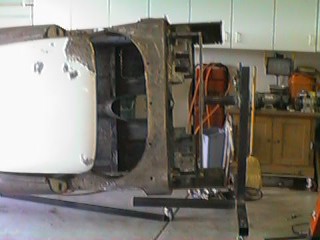 Here both ends
of the car mounted to the Rotisserie, just need to put the center bar in. The
center bar keeps everything lined up, won't let the inner sleeve back out of the
outer one when moving the the car around.
Here both ends
of the car mounted to the Rotisserie, just need to put the center bar in. The
center bar keeps everything lined up, won't let the inner sleeve back out of the
outer one when moving the the car around.
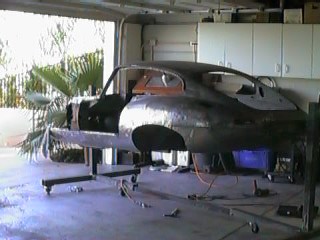
Here is the
finished product. Works great! After everything was finished I had $250 in this
tool, and 3 full days of work. If I did another one I could probably do it in
2 days. Nothing makes working on the car better than easily being able to get
to any part of the car you need to. The whole thing is a little hard to move
around for one person on a hill, but is just fine on flat ground. My driveway
is slightly sloped and so I rarely take the car outside. Now that the body is
easy to move and all areas access able its time to go to the sand blasters!
Off
to the Blasters