More Body Work than you'd care to see!
The floor pans,
cowl, and roof section work was another 60-80 hours of labor, done in Aug-Oct
2002.
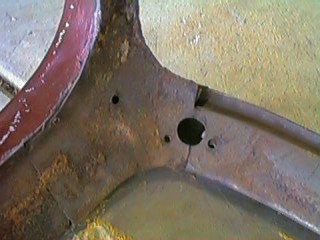
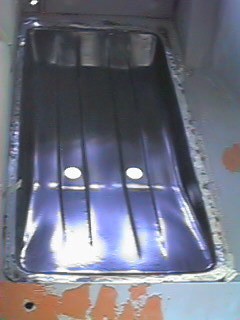 Floor pans installation
went very smoothly. The hardest part was drilling a hole every inch for the welds.
A good drill press is a bit help for this. I scribed each inch, so the welds would
be exactly the same all the way around each pan. grinding down the spot welds
was a little tricky in the front comers next to the firewall. I used a dremil
tool in the tighter areas.
Floor pans installation
went very smoothly. The hardest part was drilling a hole every inch for the welds.
A good drill press is a bit help for this. I scribed each inch, so the welds would
be exactly the same all the way around each pan. grinding down the spot welds
was a little tricky in the front comers next to the firewall. I used a dremil
tool in the tighter areas.
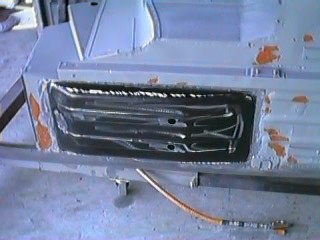
 Passenger side
pan went in just as well as the driver's side. Quick and satisfying work I did
have to sand off the primer around the welds first.
Passenger side
pan went in just as well as the driver's side. Quick and satisfying work I did
have to sand off the primer around the welds first.
 I'll strip the
original junky primer later, before putting a second coat of epoxy primer down.
For now I can fill the small dings and move on to bigger projects.
I'll strip the
original junky primer later, before putting a second coat of epoxy primer down.
For now I can fill the small dings and move on to bigger projects.
 Passenger side
pan from outside, nothing special to say for this picture.
Passenger side
pan from outside, nothing special to say for this picture.
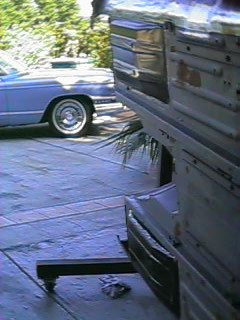 Both pans in one
shot, with my previous restoration project a 1959 Cadillac in the background.
On to the driver's side cowl.
Both pans in one
shot, with my previous restoration project a 1959 Cadillac in the background.
On to the driver's side cowl.
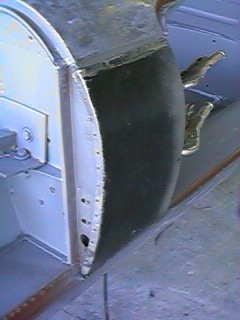
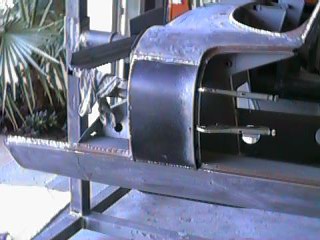 The cowl was a
somewhat challenging part to get correctly installed, both the front and rear
edges and top and bottom edges must align. Several hours of alignment were needed
to get a perfect fit. I drilled holes for every inch again for the front and rear
welds, and stitched in the top and bottom. Vice grips again were a must to hold
everything in place.
The cowl was a
somewhat challenging part to get correctly installed, both the front and rear
edges and top and bottom edges must align. Several hours of alignment were needed
to get a perfect fit. I drilled holes for every inch again for the front and rear
welds, and stitched in the top and bottom. Vice grips again were a must to hold
everything in place.
 Front view before
welding, everything is lined up and ready for simulated spot welding. Welding
is the easy part, getting everything ready for welding takes allot of time.
Front view before
welding, everything is lined up and ready for simulated spot welding. Welding
is the easy part, getting everything ready for welding takes allot of time.
 Front view after
welding ready to dress out all the welds and clean off the junk primer.
Front view after
welding ready to dress out all the welds and clean off the junk primer.
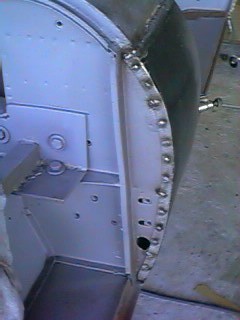
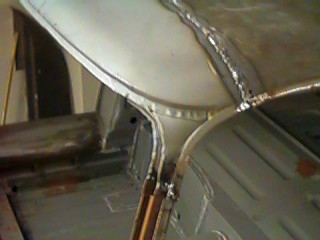
 The mostly finished
job, ready for Lead. I actually leaded in both the cowls before fitting the doors.
If I had it to do over I would skip this step and just do all the lead work at
the same time. I ended up doing allot of the cowl work over as I blended in the
doors and corrected the door gap.
The mostly finished
job, ready for Lead. I actually leaded in both the cowls before fitting the doors.
If I had it to do over I would skip this step and just do all the lead work at
the same time. I ended up doing allot of the cowl work over as I blended in the
doors and corrected the door gap.
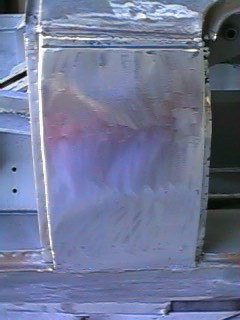
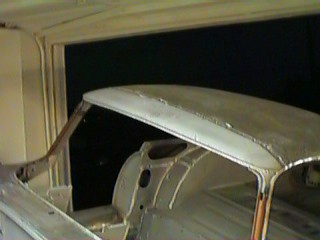
 Door and cowl are
on but are very rough. The door gap is way off, however its manageable. Many hours
of measuring, grinding, and lead work will be required to make the door gap perfect.
I'll wait on this until after other major body work in the front of the shell
is complete before doing the lead.
Door and cowl are
on but are very rough. The door gap is way off, however its manageable. Many hours
of measuring, grinding, and lead work will be required to make the door gap perfect.
I'll wait on this until after other major body work in the front of the shell
is complete before doing the lead.
 The
next problem area was the roof, its hard to know what caused the original damage
but previous body men made a huge mess of the front roof stiffener. This is the
part of the roof which has the rear view mirror and sun screen mounting hardware
built into it. If I ever wanted to be able to have sun screens I had to replace
this part. The part was spot welded in with dozens of welds and the roof had a
bunch of dents and minor bends in difficult places to fix. Also the previous body
worker had brazed patches in and ground the roof paper thin in several spots.
The
next problem area was the roof, its hard to know what caused the original damage
but previous body men made a huge mess of the front roof stiffener. This is the
part of the roof which has the rear view mirror and sun screen mounting hardware
built into it. If I ever wanted to be able to have sun screens I had to replace
this part. The part was spot welded in with dozens of welds and the roof had a
bunch of dents and minor bends in difficult places to fix. Also the previous body
worker had brazed patches in and ground the roof paper thin in several spots.
 At first I planned
on just drilling out all of the spot welds buying a new support and welding it
in, I found after some research that this is one of the few sheet metal parts
for E-types not produced by Martin Robey. Plan "B" was to find a roof
section off of a wreck. I called around to 4-5 Jag centric junkyards and finally
found one right here in California at Jaguar Heaven. Thanks to the many helpful
suggestions from those on the E-Type Mail list!
At first I planned
on just drilling out all of the spot welds buying a new support and welding it
in, I found after some research that this is one of the few sheet metal parts
for E-types not produced by Martin Robey. Plan "B" was to find a roof
section off of a wreck. I called around to 4-5 Jag centric junkyards and finally
found one right here in California at Jaguar Heaven. Thanks to the many helpful
suggestions from those on the E-Type Mail list!
 Before I had a
real plan for what to do about this area I cut the old support out. It was so
badly mangled, I knew it would have to be replaced. After cutting it out I had
planned on plug welding up all the holes, and just installing a new part, however
the front of the roof was just too far gone to be fixed with my level of metal
working skills, so I decided to cut the entire roof out and replace everything.
Before I had a
real plan for what to do about this area I cut the old support out. It was so
badly mangled, I knew it would have to be replaced. After cutting it out I had
planned on plug welding up all the holes, and just installing a new part, however
the front of the roof was just too far gone to be fixed with my level of metal
working skills, so I decided to cut the entire roof out and replace everything.
 The new roof section
from Jaguar Heaven was in great shape, still had its original paint and very little
surface rust. I paid about $400 for this part including shipping. It seemed a
little high, but I was in no position to argue, as calls to 5 other yards had
turned up nothing and this was the only one I could find.
The new roof section
from Jaguar Heaven was in great shape, still had its original paint and very little
surface rust. I paid about $400 for this part including shipping. It seemed a
little high, but I was in no position to argue, as calls to 5 other yards had
turned up nothing and this was the only one I could find.
 Other than a small
dent in the center of the roof it was perfect. I had them cut it behind the joint
where the front roof support joins the side. I'll get this part blasted before
I start to work on it. No reason to try stripping all this rust by hand. The blaster
will only charge $20 for this and his shop is 5 minutes from my office.
Other than a small
dent in the center of the roof it was perfect. I had them cut it behind the joint
where the front roof support joins the side. I'll get this part blasted before
I start to work on it. No reason to try stripping all this rust by hand. The blaster
will only charge $20 for this and his shop is 5 minutes from my office.
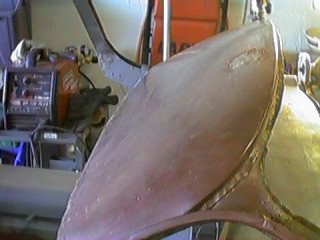
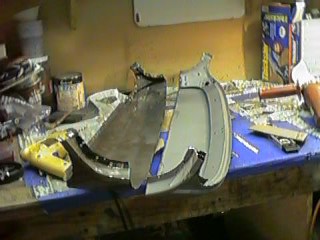
 Here is the part
of the roof which was destroyed on the old roof. Both sides were missing about
two inches of metal right where the sunscreen mounting hole was. The compound
curves and welded in bolts would have been nearly impossible to make without a
pattern.
Here is the part
of the roof which was destroyed on the old roof. Both sides were missing about
two inches of metal right where the sunscreen mounting hole was. The compound
curves and welded in bolts would have been nearly impossible to make without a
pattern.
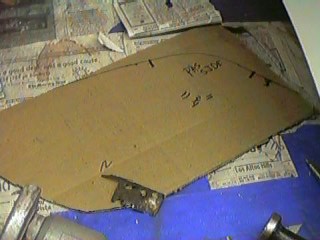 The next step was
making templates of the old roof. I made 2 for each side of the roof. One which
had the angle of the roof line and the cut points, and a second which had the
exact angle of the pillar cuts and level marked. these Templates were the only
way I had to make sure the roof angle was exactly the same once I cut the roof
off.
The next step was
making templates of the old roof. I made 2 for each side of the roof. One which
had the angle of the roof line and the cut points, and a second which had the
exact angle of the pillar cuts and level marked. these Templates were the only
way I had to make sure the roof angle was exactly the same once I cut the roof
off.
After measuring
everything about 20 times, I put a chalk line down across the top of the roof
and got my roto-zip out with a metal blade and cut the roof. No turning back
after this. It took about 3 blades in the Roto-Zip to get trough all the metal.
 I made sure I left
a little more metal than I needed on the roof, which I could cut down later with
a grinding wheel. No turning back after this cut. Its a one time shot too, so
no amount of planning should be skipped.
I made sure I left
a little more metal than I needed on the roof, which I could cut down later with
a grinding wheel. No turning back after this cut. Its a one time shot too, so
no amount of planning should be skipped.
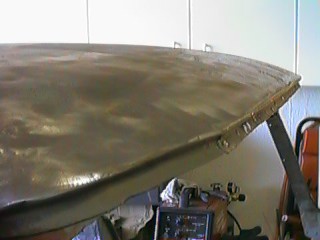
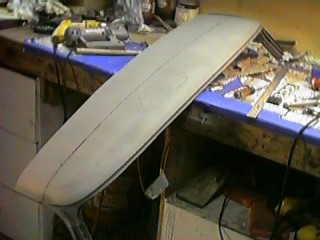 Here is the new
roof after sand blasting and marked up for cutting. The roof should be exactly
the same, but I found that it wasn't quite. there was at least 1/16" difference
in the new roof and old, this in several areas, fortunately I managed get it to
work.
Here is the new
roof after sand blasting and marked up for cutting. The roof should be exactly
the same, but I found that it wasn't quite. there was at least 1/16" difference
in the new roof and old, this in several areas, fortunately I managed get it to
work.
 Here the old roof
and new roof ar side by side for comparison. The new roof is a bit larger than
the old roof and will be fine tuned on the car using the templates as a guide.
Here the old roof
and new roof ar side by side for comparison. The new roof is a bit larger than
the old roof and will be fine tuned on the car using the templates as a guide.
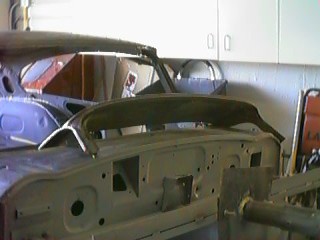
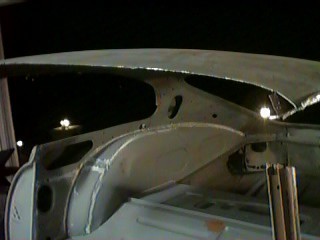
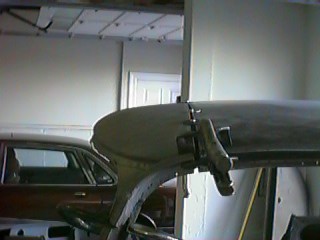
 Here I'm trying
to mate up the roof on the car. I had to go out and buy extra vice grips to hold
all the parts together. The roof fitting process took an entire day from 8:00AM
until 9:00PM before all the welds were finished. The fitting process is all trial
and error. I must have put on and taken the roof off about a hundred times before
everything was ready for welding. I use a magic marker to mark areas for cut down
and then grind, then refit mark some more etc. etc. etc.
Here I'm trying
to mate up the roof on the car. I had to go out and buy extra vice grips to hold
all the parts together. The roof fitting process took an entire day from 8:00AM
until 9:00PM before all the welds were finished. The fitting process is all trial
and error. I must have put on and taken the roof off about a hundred times before
everything was ready for welding. I use a magic marker to mark areas for cut down
and then grind, then refit mark some more etc. etc. etc.
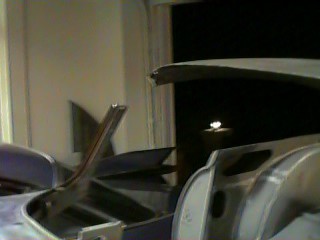
 Here things are
getting pretty close, I used washers and small nuts and bolts to keep the roof
aligned in the center. Just cut notches in the roof, and put a set of two large
flat washers on a bolt/nut. I used about 6 sets across the center. Later I'll
weld up the notches after tack welds are in place. I ended up cutting too much
metal off of the drivers side and had some fill welding to do, to do this kind
of thing, use copper plates about 1/8" on the back side of these areas to
contain the weld and build up on both sides until the area is filled. Better welding
shops and Eastwood have these copper weld backing plates. They are very handy
when working on mangled auto bodies. Make sure not to weld in any area more than
a couple seconds. Large sheets of steel like a roof are very prone to warp. I
had some ugly warps in two spots which I ended up having to shrink out with my
gas rig.
Here things are
getting pretty close, I used washers and small nuts and bolts to keep the roof
aligned in the center. Just cut notches in the roof, and put a set of two large
flat washers on a bolt/nut. I used about 6 sets across the center. Later I'll
weld up the notches after tack welds are in place. I ended up cutting too much
metal off of the drivers side and had some fill welding to do, to do this kind
of thing, use copper plates about 1/8" on the back side of these areas to
contain the weld and build up on both sides until the area is filled. Better welding
shops and Eastwood have these copper weld backing plates. They are very handy
when working on mangled auto bodies. Make sure not to weld in any area more than
a couple seconds. Large sheets of steel like a roof are very prone to warp. I
had some ugly warps in two spots which I ended up having to shrink out with my
gas rig.
 All on, and ready
for grinding, It will be several hours to cut down all the welds and patch up
any pin holes etc.
All on, and ready
for grinding, It will be several hours to cut down all the welds and patch up
any pin holes etc.
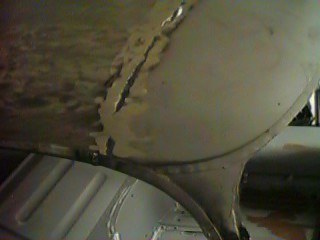
 Here you can see
the rather large fill I had to make on the Driver's side weld. It will be invisible
after grinding, but looks like heck now.
Here you can see
the rather large fill I had to make on the Driver's side weld. It will be invisible
after grinding, but looks like heck now.
 Here I'm in progress
on the grinding, both sides will be dressed out, and low spots will be lead filled
after the major low spots are filled and the high spots shrunk out. After this
I'll skim the roof with plastic filler. I don't normally like to use plastic,
but in a job like this there are too many minor high and low spots to fix without
it, even after leading. The skim of plastic will be less than 1/16" after
sanding.
Here I'm in progress
on the grinding, both sides will be dressed out, and low spots will be lead filled
after the major low spots are filled and the high spots shrunk out. After this
I'll skim the roof with plastic filler. I don't normally like to use plastic,
but in a job like this there are too many minor high and low spots to fix without
it, even after leading. The skim of plastic will be less than 1/16" after
sanding.
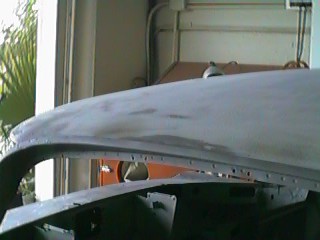 After plastic,
and sanding the roof looks pretty close to perfect. Nothing the primer and block
sanding won't fix.
After plastic,
and sanding the roof looks pretty close to perfect. Nothing the primer and block
sanding won't fix.
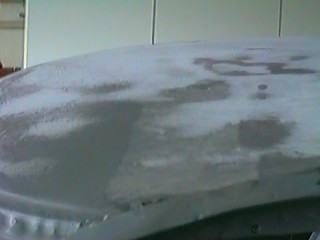 Here you can see
the first pass of plastic. I used 2 coats and sanded after each with an electric
orbital sander with 36 grit paper followed by 80 Grit.
Here you can see
the first pass of plastic. I used 2 coats and sanded after each with an electric
orbital sander with 36 grit paper followed by 80 Grit.
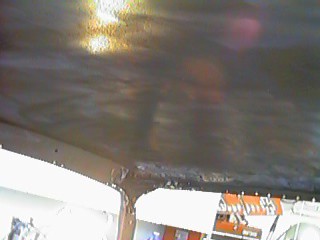
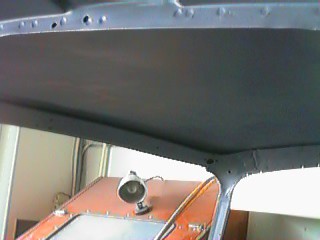 The roof on the
inside was also skimmed to make sure any low spots were filled and after sanding
A quick coat of DP40 helped blend everything in. Its hard to tell it was ever
done.
The roof on the
inside was also skimmed to make sure any low spots were filled and after sanding
A quick coat of DP40 helped blend everything in. Its hard to tell it was ever
done.
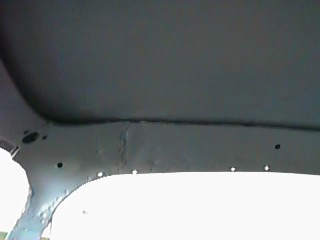 This joint will
need a little filler to be invisible. I'll also probably fill the holes in the
roof rail and drill new ones when installing the new weather stripping track.
This joint will
need a little filler to be invisible. I'll also probably fill the holes in the
roof rail and drill new ones when installing the new weather stripping track.
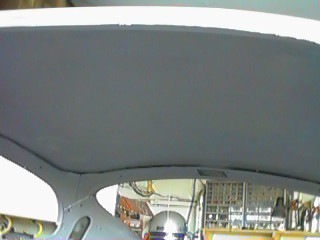
The rear section
of the roof had a number of dings which were hammered out and a small amount
of plastic was used to fill both sides. This was mainly to cover pick hammer
marks etc. I use Ever coat plastic and have found it a great product.
Lead Working