Trunk tub fitting, part 3, more lead work!
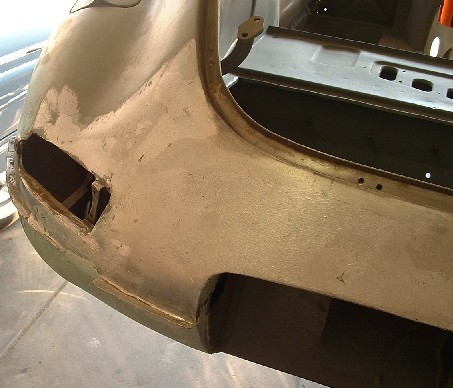
It took an
afternoon of work to get the tail light holes trimmed out and to figure out
that there was a problem with what I had welded the back together. Even though
the new tub went into place perfectly, the angle of the rear deck was steeper
than it should have been leaving a 1/4" gap in the worst places around
the tail lights. So I had to lead in the back to match the tail light housing
angle. I looked at several other Series 1 FHC's and took many pictures to get
a close idea of now the rear deck angle coming off the fenders should be.
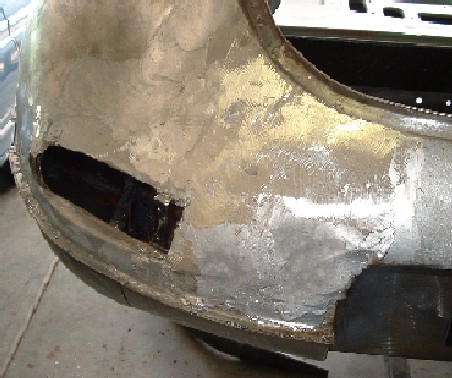
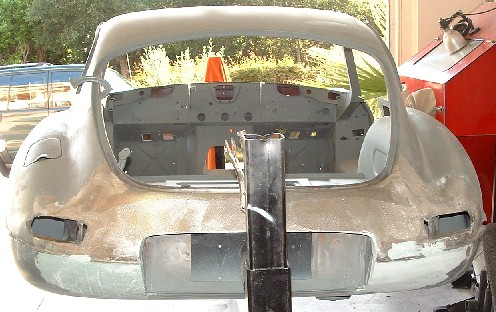
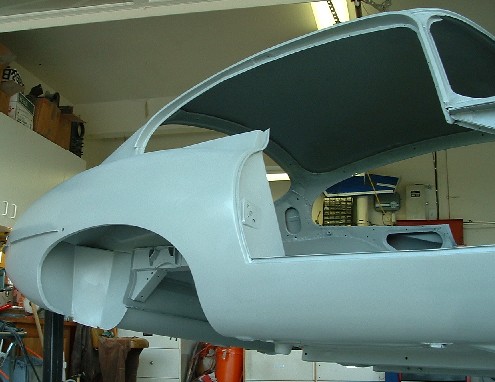
 Here you can see
the fit almost correct after lead was added to fill in. I probably used about
30 pounds of lead bars but ended up with less than 20 pounds of lead in the back
by the time I filed everything down. Its slow tedious work but the results are
hard to beat.
Here you can see
the fit almost correct after lead was added to fill in. I probably used about
30 pounds of lead bars but ended up with less than 20 pounds of lead in the back
by the time I filed everything down. Its slow tedious work but the results are
hard to beat.
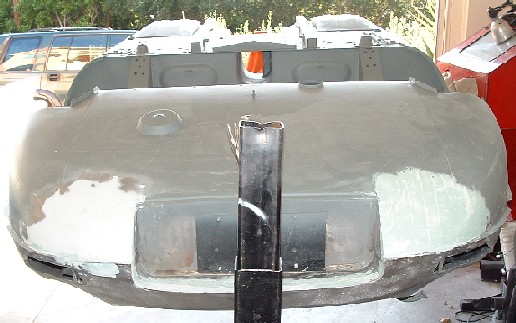
 Once I get the
right gap and angle I will blend in the rest of the deck with lead and file out.
Lead melts around 400F so I heat the body up in the area I'm working to about
350 allowing about a six inch area of lead to spread like butter on bread. Using
lead paddles I smooth the lead as much as possible. Usually I build up about 1/8"
more lead than I think I need so I have room to file down into finial shape.
Once I get the
right gap and angle I will blend in the rest of the deck with lead and file out.
Lead melts around 400F so I heat the body up in the area I'm working to about
350 allowing about a six inch area of lead to spread like butter on bread. Using
lead paddles I smooth the lead as much as possible. Usually I build up about 1/8"
more lead than I think I need so I have room to file down into finial shape.
 I built up the
rear deck extending the edge of the steel out about 1/2". This is a time
when having the car on a rotisserie is a must as it is almost impossible to lay
lead on the underside of the license plate frame etc. It took about 2 weeks of
lead work to get the entire deck done,15-20 hours total. Lead work is something
which is impossible to rush, and which gets old very quickly. About 2-3 hours
with a torch and respirator is all I can stand. Its impossible to just knock out
lead work. You must make several passes to build up lead and fix small low spots
etc. After getting the shape about right with files I use a DA sander with 80
grit paper to finish the surface.
I built up the
rear deck extending the edge of the steel out about 1/2". This is a time
when having the car on a rotisserie is a must as it is almost impossible to lay
lead on the underside of the license plate frame etc. It took about 2 weeks of
lead work to get the entire deck done,15-20 hours total. Lead work is something
which is impossible to rush, and which gets old very quickly. About 2-3 hours
with a torch and respirator is all I can stand. Its impossible to just knock out
lead work. You must make several passes to build up lead and fix small low spots
etc. After getting the shape about right with files I use a DA sander with 80
grit paper to finish the surface.
 Starting to get
the right hand tail light area into shape here. Before putting down lead you must
tin the surface with tinning butter. Tinning butter is a mild acid like solder
flux with lead mixed in. The lead soaks (tinning) into the steel forming a bond
that is stronger by far than any paint. The original 40 year old lead had to be
melted or ground off. As good as modern plastic fillers are at bonding, lead is
still stronger. If you intend to build up an area more than 1/8" Lead is
the way to go. Just wish it wasn't so hard to work with.
Starting to get
the right hand tail light area into shape here. Before putting down lead you must
tin the surface with tinning butter. Tinning butter is a mild acid like solder
flux with lead mixed in. The lead soaks (tinning) into the steel forming a bond
that is stronger by far than any paint. The original 40 year old lead had to be
melted or ground off. As good as modern plastic fillers are at bonding, lead is
still stronger. If you intend to build up an area more than 1/8" Lead is
the way to go. Just wish it wasn't so hard to work with.
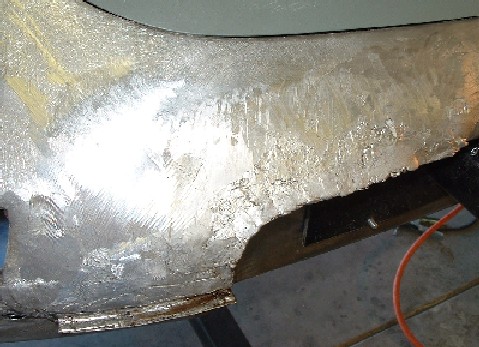
 Just about done
here, you can see some small imperfections in the lead which will be covered with
skim of plastic and sanded out. Its very important to super clean the metal around
the lead to remove all traces of acid or wax. I used a scotch brite disk on a
die grinder for this. After this I hose down the entire area in a solution of
baking soda and water and then grease and wax remover. Then apply plastic filler
over the entire area to skim out any small highs and lows.
Just about done
here, you can see some small imperfections in the lead which will be covered with
skim of plastic and sanded out. Its very important to super clean the metal around
the lead to remove all traces of acid or wax. I used a scotch brite disk on a
die grinder for this. After this I hose down the entire area in a solution of
baking soda and water and then grease and wax remover. Then apply plastic filler
over the entire area to skim out any small highs and lows.
On the bottom
I put a small amount of lead in the corner of to build up around the thickest
area of lead at the rear seam, and then plastic filler went over it. Probably
1/4 inch thick in a small area. Normally I don't put plastic in this thick but
this should be fine in this part of the car. The next step is to skim the top,
sand out and prime.
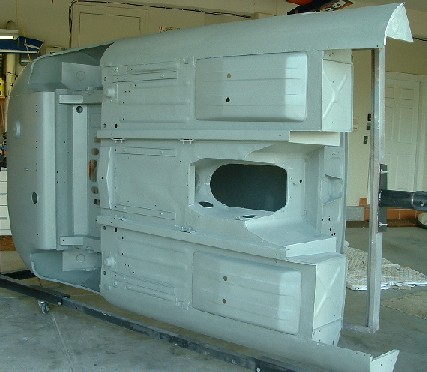
 Here is a bottoms
up view of the project. A thin skim of plastic was all that was needed to get
the under side of the license plate frame smoothed in. The tub didn't need much
filler except in the rear to help match the top side lead work. Just a few more
hours of sanding and filling and the paint will be on.
Here is a bottoms
up view of the project. A thin skim of plastic was all that was needed to get
the under side of the license plate frame smoothed in. The tub didn't need much
filler except in the rear to help match the top side lead work. Just a few more
hours of sanding and filling and the paint will be on.
 Here is a shot
of the second coat of DP40 on the car. I put 2 coats of PPG DP 40 on the entire
car, and waxed inside all of the panels just after. I shot wax on the inside of
the sills before patching them but added some more wax through the inner sill
holes after the last coat of epoxy.
Here is a shot
of the second coat of DP40 on the car. I put 2 coats of PPG DP 40 on the entire
car, and waxed inside all of the panels just after. I shot wax on the inside of
the sills before patching them but added some more wax through the inner sill
holes after the last coat of epoxy.
 After this coat
of paint I'll put on high build primer on and start the long and tedious block
sanding process.
After this coat
of paint I'll put on high build primer on and start the long and tedious block
sanding process.
 Looking pretty
good to me! Hopefully this will just get better as the next coats of primer go
on.
Looking pretty
good to me! Hopefully this will just get better as the next coats of primer go
on.
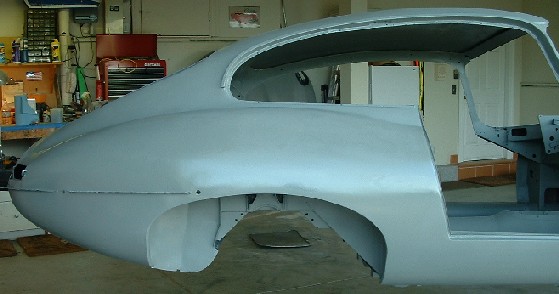 This car's lines
are hard to beat. I will make templates of the rear of the car and send them to
a shop in Southern CA who will custom make bumpers to fit. The original bumpers
were tweaked. Once I corrected the shape of the tail of the car they weren't even
a close fit, standard bumpers also are most likely not going to be a perfect fit
so I'll get some custom made.
Electro
plating parts!
This car's lines
are hard to beat. I will make templates of the rear of the car and send them to
a shop in Southern CA who will custom make bumpers to fit. The original bumpers
were tweaked. Once I corrected the shape of the tail of the car they weren't even
a close fit, standard bumpers also are most likely not going to be a perfect fit
so I'll get some custom made.
Electro
plating parts!