How to Electro Plate with Zinc!
Maybe I'm
insane, but when I started looking at all the hardware I would have to replace
or have re plated and the complexity and expense of packing up all the little
parts out and hoping nothing was lost etc, it became clear that home plating
would be a better solution if I could do it with the same level of quality
as the professional shops. I already have a bead cab and buffing wheel, so
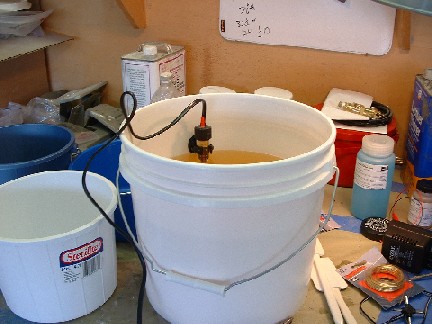
only the electro plating system was required. This is a 3 gal Copy Cad kit
I bought from Caswell plating. It with a few additions allows for Silver Zinc,
Golden Zinc and Black oxide Zinc plating. In addition to the bucket in the
center, you'll need several other clean plastic buckets and a way to heat
water, some copper pipe for tank bars and brass or copper wire for hanging
parts. Plating is mildly dangerous as acid and other chemicals are required.
I wear heavy rubber gloves when working with the chemicals, and have an open
garage with good ventilation to avoid breathing concentrated fumes from the
plating tank. Zinc plating is not nearly as dangerous as Chrome or other heavy
metals, but still should be taken seriously. Ok enough of that safety talk.
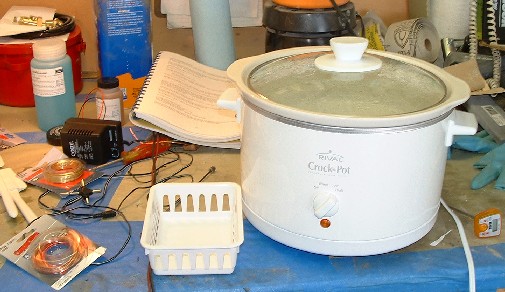 I bought a cheap
crock pot my local hardware store ($23) to heat water. Its important to have hot
water for the parts cleaning system. The Plating tank is heated to around 90 degrees
F. with a fish tank heater. The crock pot heats water to about 190 Degrees F.
which is used for a soap solution for parts degreasing solutions. I use a second
fish tank heater to heat a muratic acid solution as well. You can also see some
of the other tools. hanger wire in Copper and Brass. A 1 Amp Power supply from
local electronics store, Digital Thermometer.
I bought a cheap
crock pot my local hardware store ($23) to heat water. Its important to have hot
water for the parts cleaning system. The Plating tank is heated to around 90 degrees
F. with a fish tank heater. The crock pot heats water to about 190 Degrees F.
which is used for a soap solution for parts degreasing solutions. I use a second
fish tank heater to heat a muratic acid solution as well. You can also see some
of the other tools. hanger wire in Copper and Brass. A 1 Amp Power supply from
local electronics store, Digital Thermometer.
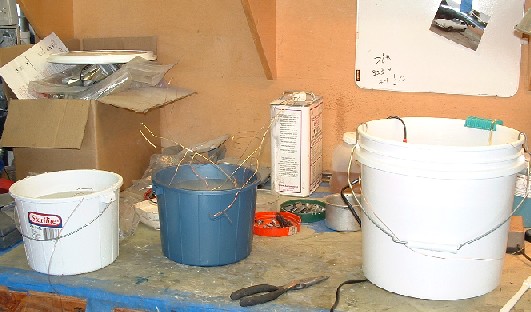
Setup takes
several hours and I would recommend that if you do plating to save up at least
30-40 parts and do in a batch. this will take at least a day. Before starting
I bead blast all the parts twice to get all old plating or rust and visible
dirt off. This can be time consuming with small bolts; the threads are quite
difficult to get completely clean. The White bucket is clean water, The Blue
bucket is the Muratic acid solution, I mixed this about 20 to 1 with water.
20 parts water to 1 part acid very mild. I later freshened up the solution with
another part of acid when I notice the action slowing on new parts dipped. The
Caswell manuals are very good and go through
all the details.

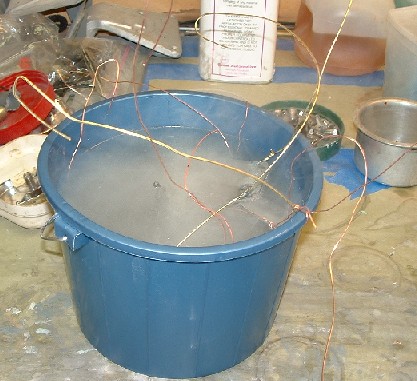
After all the
parts were as clean as possible, I wired them up to the copper or brass wire
tank hanger wires. I tried to put smaller parts together on one string. The
more surface area the parts have the more power is required to plate. The manuals
go into this, and talk about using batteries and light bulbs to control current,
but really you need a fairly large DC power source between 1 and 12 volts at
up to 20 amps. Depends on what you are doing. a car battery and charger works
but a large Rheostat is needed, or other power soak are needed to control the
power. The best method for judging if you have the power right is to watch the
bubbles on the parts as they plate. To many bubbles and the plating will be
rough. Not enough and the plating comes out thin and dull gray. If you get parts
with a poor finish you can clean them up and plate again until the finish improves.
It takes practice but as with most things the more you do the better you get.
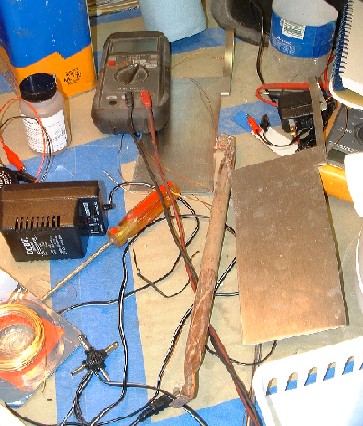
Here you can
see the tank Anode, Copper tank bar, and my power supply. I cut part of the
anode to make a hanger and wired the to plates together to make them easy to
connect to the power. The small DC supply I bought wasn't nearly enough power
to do larger parts and over heated smoking finally as I turned it to higher
settings to try and get larger parts to plate. I will replace this on the next
batch with a battery or some other DC supply. I checked at Fry's (my local electronics
store) and found a 20 amp DC supply designed for bench test. It has controls
for amps and volts and digital meters etc. about $200.
Here is the
cleaning tank, Caswell calls the powder
I mixed with water SP de greaser, but it feels and smells like laundry detergent
mixed with ammonia. I mix it with hot water and soak the clean parts in this
before dropping them into the acid tank. After plating is complete I soak the
parts in this to kill the acid from the plating tank. The parts I started with
were door locks and rear hatch hardware. I needed these parts to be clean and
rust free before I hung the door and hatch lid for finial fitting and block
sanding. These parts are mostly hidden when the car is complete so any sub standard
plating won't be visible in the finished car.
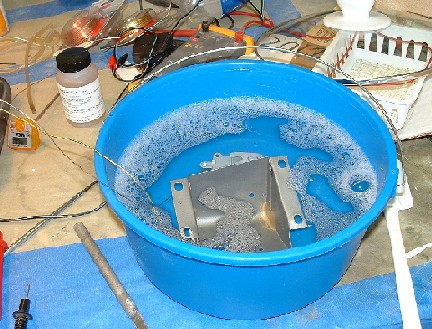
 Here is the acid
tank at work parts bubbling away. I leave parts in this for around 30 minutes
and then dumped them into a fresh water holding tank. The Fresh water tank kills
the acid and slows down flash rust. Steel parts will flash rust in seconds after
being pulled out of this acid bath. You can actually watch the rust form on parts.
Even under water the parts start rusting while waiting to go into the plate tank.
If parts stay to long in either water or acid tank you need to blast them and
start over.
Here is the acid
tank at work parts bubbling away. I leave parts in this for around 30 minutes
and then dumped them into a fresh water holding tank. The Fresh water tank kills
the acid and slows down flash rust. Steel parts will flash rust in seconds after
being pulled out of this acid bath. You can actually watch the rust form on parts.
Even under water the parts start rusting while waiting to go into the plate tank.
If parts stay to long in either water or acid tank you need to blast them and
start over.
 Here is the plating
tank at work. The part I'm plating is the tank bar. This was the first part I
plated. The manual says to start with your plating bar to purify the plating tank.
This gets any foreign metal onto a part that doesn't matter and keeps your plating
bar from corroding later. Copper turns green very quickly after coming in contact
with acid and doesn't conduct. Notice the air pipe in the tank. This is a fish
tank air pump and hose with a gang valve to control. It is used to agitate the
plating solution while plating keeping bubbles from forming on the part. Bubbles
which stick on the part can lead to a poor finish if they are aren't knocked off
periodically. In the future I think I'll find a better solution for this. Possibly
attach a vibrator t the tank bar. The air hose is hard to keep under water and
near the part. The other solution to this problem is just to move the part by
hand as the plating is in process.
Here is the plating
tank at work. The part I'm plating is the tank bar. This was the first part I
plated. The manual says to start with your plating bar to purify the plating tank.
This gets any foreign metal onto a part that doesn't matter and keeps your plating
bar from corroding later. Copper turns green very quickly after coming in contact
with acid and doesn't conduct. Notice the air pipe in the tank. This is a fish
tank air pump and hose with a gang valve to control. It is used to agitate the
plating solution while plating keeping bubbles from forming on the part. Bubbles
which stick on the part can lead to a poor finish if they are aren't knocked off
periodically. In the future I think I'll find a better solution for this. Possibly
attach a vibrator t the tank bar. The air hose is hard to keep under water and
near the part. The other solution to this problem is just to move the part by
hand as the plating is in process.

Here are the
first parts done with the system. Not bad but could get better. The two pipes
at the front left are sections of copper pipe I used for tests. The rear parts
were plated in two batches the Spring as a batch and the brackets as a second
batch. As soon as the parts came out of the plating tank they went back into
the degreasing tank to kill the acid and then I cut the wires. Avoid touching
the parts until the dry and cool off. The acid and oil on your skin will leave
black smudges.
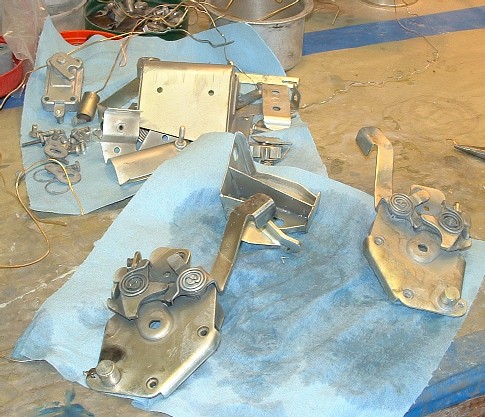 Larger parts like
these door latches were plated whole. I was worried that the mechanics wouldn't
work after plating if I didn't completely tear them down. This was not the case.
These latches worked just fine after plating. The power supply I had wasn't powerful
enough to plate such large parts so even though I left the parts in the tank for
30 minutes or more they came out with a grayish tint in some areas. I helped correct
this by flash dipping half of the part at a time for a few seconds. But still
had some gray in the middle around the springs etc.
Larger parts like
these door latches were plated whole. I was worried that the mechanics wouldn't
work after plating if I didn't completely tear them down. This was not the case.
These latches worked just fine after plating. The power supply I had wasn't powerful
enough to plate such large parts so even though I left the parts in the tank for
30 minutes or more they came out with a grayish tint in some areas. I helped correct
this by flash dipping half of the part at a time for a few seconds. But still
had some gray in the middle around the springs etc.
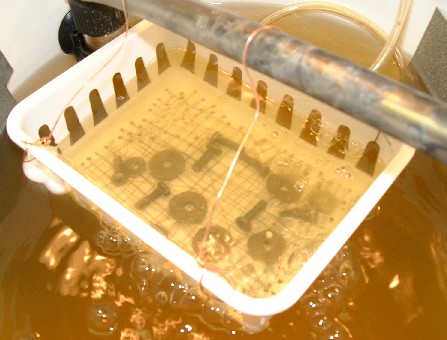
To quickly
plate small nuts and bolts I made this plating basket out of copper wire threaded
through holes in the bottom of this $.99 plastic basket from the hardware store.
The parts are just tossed into the basket and current flows through the copper
hangers. The parts make contact with the wire on the bottom. Occasional shaking
of the basket helps avoid any marks on the parts from the wires. My power supply
was a little weak but after some parts were removed it worked perfectly. With
a larger supply I could do several dozen parts at a time with this. setup. Saves
allot of time. This idea came from the very complete Caswell plating manual.
So far I have been really impressed with how easy plating is once you get setup.
Its not something I'd recommend unless you have large quantities of parts. The
setup time is several hours and the total investment could be $200-$500 depending
on how serious you get. The kit and accessories was about $250. The parts from
the hardware store were $50. If I go with a high end Power supply its another
$200. Still I'd guess it pays for its self after 2-3 batches of parts. If I
avoid loosing 1 hard to find part it will be worth what I paid. Later in the
restoration I may get a Nickel plating kit for all the suspension parts. Will
need at least a 5 gallon tank for this.
Block
Sanding and Sanding, and Sanding!